cocos2d-x v3.6 Release Notes
Table of Contents generated with DocToc
Misc Information
- Full Changelog
- v3.0 Release Notes can be found here: v3.0 Release Notes
Requirements
Runtime Requirements
- Android 2.3 or newer
- iOS 5.0 or newer
- OS X 10.7 or newer
- Windows 7 or newer
- Windows Phone 8.1
- Linux Ubuntu 14.04 or newer
Compiler Requirements
- Xcode 5.1 or newer for iOS or Mac
- gcc 4.9 or newer for Linux
- ndk-r10c for Android
- Visual Studio 2012 or newer for Windows (win32)
- Visual Studio 2012 or newer for Windows Phone 8
How to run tests
Mac OSX & iOS
- Enter
cocos2d-x/buildfolder, opencocos2d_test.xcodeproj - Select
iOSorOS Xtarget in scheme toolbar - Click
runbutton
Android
You can run the samples...
Using command line:
$ cd cocos2d-x
$ ./setup.py
$ cd build
$ ./android-build.py cpp-empty-test -p 10
$ adb install cocos2d-x/tests/cpp-empty-test/proj.android/bin/CppEmptyTest-debug.apk
Then click item on Android device to run tests. Available value of -p is the API level, cocos2d-x supports from level 10.
Using Eclipse:
$ cd cocos2d-x
$ ./setup.py
$ cd build
$ ./android-build.py cpp-empty-test -p 10
Then
- Import cocos2d-x Android project into Eclipse, the path used to import is
cocos/2d/platform/android - Import
cpp-empty-testAndroid project into Eclipse, the path used to import istests/cpp-empty-test/proj.android - Build
cpp-empty-testAndroid project and run
Windows
- Enter
cocos2d-x/build, and opencocos2d-win32.vs2012.sln - Select
cpp-empty-testas running target - Click run button
Linux
$ cd cocos2d-x/build
$ ./install-deps-linux.sh
$ cd ../..
Then
$ mkdir build
$ cd build
$ cmake ../cocos2d-x
$ make -j4
Run
$ cd bin/cpp-empty-test
$ ./cpp-empty-test
How to start a new game
Please refer to this document: ReadMe
v3.6
Highlights of v3.6
- 3D: added skybox support
- 3D: added terrain support
- added
SpritePolygonto fix overdraw issue - used luajit v2.1-20150331 on 64-bit iOS devices
- removed WP8 support
- memory usage optimization of
ui::Button - 3rd: updated Spine runtime to v2.1.25
- 3rd: updated libcurl to v7.4 on all supported platforms except WP8.1 universal
- 3rd: updated chipmunk to v6.2.2
- 3rd: updated openssl to v1.0.11
- 3rd: updated freetype to v2.5.5
- 3rd: updated png to v1.6.16
Because Angle doesn't support WP8 any more, and WP8's market share is around 20% worldwide with variations across countries, so we removed WP8 support suggested by MS OPEN TECK guys since v3.6.
Features in detail
3D TextureCube
TextureCube is useful for skybox and environment mapping. It uses 6 faces of a cube as map shape, and 6 pictures are projected onto the sides of a cube and stored as six square textures.
TexturesCube usage
auto texturecube = TextureCube::create("left.jpg", "right.jpg", "top.jpg", "bottom.jpg","front.jpg", "back.jpg");
//set texture parameters
Texture2D::TexParams tRepeatParams;
tRepeatParams.magFilter = GL_NEAREST;
tRepeatParams.minFilter = GL_NEAREST;
tRepeatParams.wrapS = GL_MIRRORED_REPEAT;
tRepeatParams.wrapT = GL_MIRRORED_REPEAT;
texturecube->setTexParameters(tRepeatParams);

//create a GLProgramState using custom shader
auto shader = GLProgram::createWithFilenames("cube_map.vert", "cube_map.frag");
auto state = GLProgramState::create(shader);
// pass the texture sampler to our custom shader, state is a pointer of GLProgramState, u_cubeTex is a uniform in shader
state->setUniformTexture("u_cubeTex", texturecube);
Then the shader cube_map.frag can be something like this,
varying vec3        v_reflect; //reflect direction
uniform samplerCube u_cubeTex;

void main(void)
{
    gl_FragColor = textureCube(u_cubeTex, v_reflect); //sample the color of reflection direction
}
For more information please refer to cpp-tests/Sprite3DTest/Sprite3DCubeMapTest.
3D Skybox
Skybox is a common component in 3D game. It is based on TextureCube.
Usage of skybox
// create a texture cube
auto textureCube = TextureCube::create("left.jpg", "right.jpg","top.jpg", "bottom.jpg","front.jpg", "back.jpg");
//create a skybox
auto skyBox = Skybox::create();
skyBox->retain();
//set cube texture to the skybox
skyBox->setTexture(textureCube);
addChild(_skyBox);
For more information please refer to cpp-tests/Sprite3DTest/Sprite3DCubeMapTest.
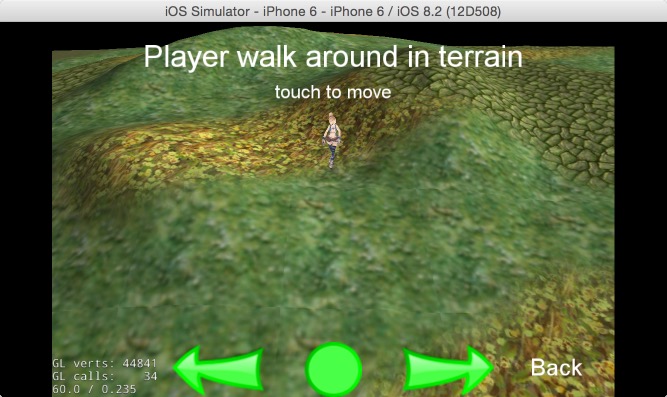
3D Terrain
Terrain is an important component in 3D game. A texture is used to stand for the height map. And up to 4 textures can be used to blend the details of the terrain, grass, road, and so on.
Usage of terrain
//blended layers
Terrain::DetailMap dirt("TerrainTest/dirt.jpg"), grass("TerrainTest/Grass2.jpg"), road("TerrainTest/road.jpg"), green("TerrainTest/GreenSkin.jpg");

//height map, alpha map (blend weight), and blended layers
Terrain::TerrainData data("TerrainTest/heightmap16.jpg", "TerrainTest/alphamap.png", dirt, grass, road, green);

//create terrain here
_terrain = Terrain::create(data,Terrain::CrackFixedType::SKIRT);
//set lod distance
_terrain->setLODDistance(3.2,6.4,9.6);
//it must be less than 5
_terrain->setMaxDetailMapAmount(4);
addChild(_terrain);
For more information please refer to cpp-tests/Sprite3DTest/TerrainTest.
Animate3D Quality Control
In order to make Animate3D run fast, you can use low quality animation. There are three types of animation quality:
- Animate3DQuality::QUALITY_NONE
- Animate3DQuality::QUALITY_LOW
- Animate3DQuality::QUALITY_HIGH
Animate3DQuality::QUALITY_NONE means the animation will not be updated. You can use this type on the animation that you are sure it is not visible. Animate3DQuality::QUALITY_LOW will use the nearest keyframe to display current frame; Animate3DQuality::QUALITY_HIGH will will interpolate between keyframes.
std::string fileName = "Sprite3DTest/orc.c3b";
auto sprite = Sprite3D::create(fileName);
addChild(sprite);

auto animation = Animation3D::create(fileName);
if (animation)
{
   auto animate = Animate3D::create(animation);
   //use low quality animation
   animate->setQuality(Animate3DQuality::QUALITY_LOW);
   sprite->runAction(RepeatForever::create(animate));
}
The animation quality is also configurable in config.plist, the key is cocos2d.x.3d.animate_high_quality. All created Animate3D base on this key if exist. You can modify it using the above method.
Un-bottleneck your fill-rate with SpritePolygon
SpritePolygon is a 2d Node, like Sprites, it displays a 2d Image.
But the difference is where Sprites is made of 2 triangles to form a quad, SpritePolygon is made of N number of triangles. It is an experimental feature.
![]()
This allows the GPU to draw the same graphics with much lower pixels.
Because 2d games tends to not use much vertices compared to 3d games, but almost of all sprites are none rectangular, GPU wastes precious bandwidth drawing area that is totally transparent. Fill-rate is often the bottleneck in a graphic intense 2d game. SpritePolygon is the perfect cure for "Over-Draw".
Following picture is the result of performance comparing, corresponding performance test cases are in tests/cpp-tests/Classes/SpritePolygonTest:
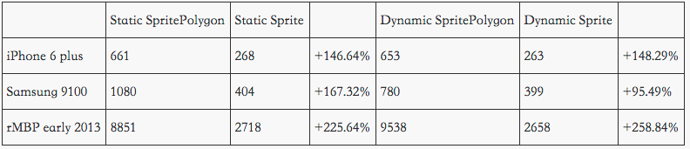
For more detail description of SpritePolygon please refer to this thread
luajit arm64
The version of the luajit is v2.1-20150331. We have consulted the author of luajit, he said it was stability enough to be used. We will update to v2.1 when it is released.
Using luajit arm64 version is that because it can improve the performance. In previous versions of cocos2d-x, it uses lua on iOS 64-bit devices.
Bytecode of luajit and luajit arm64 are not compatible, which means you can not use one version of bytecode on iOS 32-bit devices and iOS 64-bit devices.
As there is not mandatory requirement of having arm64 bit bin on Android, so we don't use luajit arm64 on Android as its bytecode is not compatible with luajit arm32.
Button memory usage optimization
Now the title label of Button is created on demand. A Button without title won't create an extra empty label.
And we have also removed some redundant string variables in Button's header file.
We use Cpp-Empty-Test to verify this optimization.
Here is the test code:
auto visibleSize = Director::getInstance()->getVisibleSize();
auto origin = Director::getInstance()->getVisibleOrigin();

int num = 100;
for (int i=0; i < num; ++i)
{
auto button = ui::Button::create("ClosedNormal.png",
"ClosedSelected.png");
button->setPosition(origin + visibleSize/2);
this->addChild(button);
}
And here is the result:
On iOS platform
| Num of buttons | 100 | 200 | 500 | 1000 |
|---|---|---|---|---|
| Before optimization | 61M | 61.9M | 67.1M | 72.2M |
| After optimization | 60.7M | 61.1M | 66M | 67.9M |
On Mac platform
| Num of buttons | 100 | 200 | 500 | 1000 |
|---|---|---|---|---|
| Before optimization | 26.8M | 27.1M | 33.2M | 35.4M |
| After optimization | 25.1M | 25.9M | 28M | 32.4M |